Saturday, December 31, 2011

Christmas 2011 Handcrafted Gift Wrap-Up 1

This is the first of several posts showing off all the items I made for holiday gifts this year.  


Painted clothespins with a length of coordinating yarn to hold artwork, photos, etc.   On both sides of each, I painted the clothespins with acrylic paint, added a rubber stamp design and glittered the clip end.  I used hot glue to add some fake berries and a few tiny silk leaves on one side.  I clipped the clothespins to some plain cardboard, using the center two clothespins to hold the 2 yard length of yarn.

I gave these to my mother, my sister and my husband's step-mother.  Ama, Auntie Ree & Grandma Lena.


This would be another case of forgetting to take the final picture.  These are the flower pots the kids made for their teachers.  I got the idea from Giggles Galore: Thanks for Helping Me Grow (Teachers' Gifts).  I bought pansies to go in the pots, but potted them with the dirt in a plastic bread bag so the pots could be used as pencil containers or something else.  We used white crayon as chalk.  Jasper decorated his pot with more than just the words.  He even added an owl for his teacher who loves owls.  We included gift cards for lunch for all the teachers.  


I got the idea and instructions for these from Craft Whatever: Tutorial: Father's Day Grillin' Towel.  I mostly followed her instructions though I used double fold bias tape for the bottom trim and I used Velcro instead of grommets.  I also used fabric from thrift store shirts instead of buying new.  I wish I'd found the Hawaiian print first.  I would've used it for all three!  I made two of the plaid with BBQ spelled out on three different iron-on patches and one of the Hawaiian print with BBQ on one patch.  

I gave these to my husband, my father and my father-in-law.  Dad, Apa & Grandpa.  


Friday, December 30, 2011

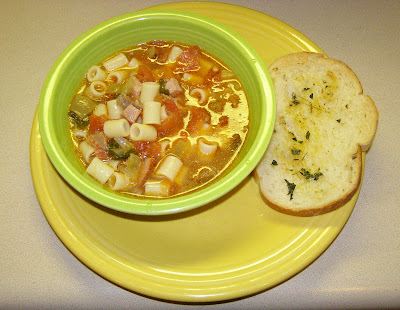
Pizza Soup

Thanks to my best friend's children (sleeping over for the night) for cleverly naming this soup. It was YUM and easily fed the three extra mouths in my house.  Did I mention they all belonged to teenagers?!  TWO boys and a girl?  I know... brave.

1 lb Italian Sausage, bulk or removed from casings (I used mild since I'm feeding kids)
1/4 lb pepperoni (I used the slices and quartered them for soup size)
1/2 lb ham, diced
1 medium bell pepper, diced
1 medium onion, diced
1 quart diced tomatoes (yes... they were home canned)
6 cups chicken stock
6 cups water
1 bouillon cube (I used beef because I was out of chicken)
2 cups shaped pasta, such as elbow or fusilli
1/2 small bunch of kale, destemmed & roughly chopped into small pieces

Heat a 6 quart soup pot over medium-high heat.  Add sausage, breaking up with spoon.  Cook until browned.  Add pepperoni & ham.  Cook for 2 minutes.  Add bell peppers & onions.  Cook for 3 minutes.  Add the tomatoes, chicken stock, water & bouillon cube.  Bring to a boil.  Stir in pasta & kale.  Cook for 8 minutes.

I served this with Italian bread, sliced, brushed with garlic powder, oregano & olive oil and toasted under the broiler in the oven.  This recipe fed three adults, three teenagers, one 8yo & a 4yo with leftovers.  To make it thicker and serve a "normal" family, leave out the 6 cups of water and drop the pasta to only one cup.

A note about bell peppers & onions:  To make your life WAY easier and dinner prep WAY faster, chop or dice these both in bulk and freeze.  Neither bell peppers nor onions need any sort of blanching to freeze.  Just cut to the size you want, lay out on a cookie sheet and freeze for an hour.  Transfer flash frozen onions or peppers to zip-top bags or freezer containers.  When you need them, take out just what you need and return the rest to the freezer.  You will need to add a minute or two of cooking time when starting with frozen veggies.  That takes far less time than cutting them every time you need them and frees you up to do something else. It also gives you the chance to buy local and/or organic in the summer and freeze for the year.  I buy seconds at my farmer's market and pay a fraction of grocery store prices.  Saving time AND saving money.  Win-win.


Chili-esque Sloppy Joe Sandwiches

How's that for a recipe title?  I have no clever name for this but it was yummy.

1 lb ground chicken (or 2 lb if you don't have any TVP)
2 Tbl chili powder
1 Tbl cumin
1 Tbl grill seasoning
1 medium onion, diced
1 medium bell pepper, diced
1 carrot, shredded
8 oz tomato sauce
1 c TVP

Preheat medium skillet over medium-high heat.  Add ground chicken, chili powder, cumin & grill seasoning.  Cook, breaking up with spoon, until chicken is brown.  Add onion, bell pepper, carrot, tomato sauce and TVP.  Add a bit of water if there isn't enough from the tomato sauce to rehydrate the TVP.  Simmer until TVP is rehydrated and most of the liquid from the tomato sauce has cooked off.  Serve over toasted hamburger buns.

A note about TVP:  TVP stands for Texturized Vegetable Protein.  It's just soy processed into crumbles.  It comes in different size crumbles for different uses.  I like Bob's Red Mill TVP.  TVP is a very inexpensive protein source and a great way to stretch your food dollar.  One cup rehydrates to the equivalent of about one pound of meat and costs less than one dollar.  I use it as the sole protein source sometimes and sometimes, like this recipe, I use it to stretch another protein.  My award winning vegetarian chili uses TVP and is hard to tell apart from my non-vegetarian chili.  Don't fear the strange hippy food!  It's a blank canvas that can easily be flavored to fit what you want.  And it's CHEAP!

Monday, December 26, 2011

Turkey & Bacon Shepherd's Pie

I forgot again so no picture.  It's a shame too because this looked beautiful when it came out of the oven.

4 medium potatoes, peeled & cubed
4 slices bacon, cut into 1" pieces
1 pound ground turkey
2 tsp paprika
2 tsp cumin
2 tsp dried thyme
Salt & pepper, to taste
1 medium onion, chopped
2 carrots, diced
3 celery ribs, diced
1 small bell pepper, any color, diced (I used about a 1/2 c diced out of my freezer)
Additional veggies - whatever you have, about 2 cups.  I used frozen broccoli
2 Tbl flour
1 cup stock, chicken, veggie, whatever you have at the ready
1 egg, beaten
3 Tbl butter or margarine

Bring a medium pot of salted water to boil and cook the potatoes.  Bring to a boil then reduce heat to a simmer for 10 to 12 minutes.

Once the potatoes are on, toss the bacon into a large skillet over medium-high heat.  Cook until about half way brown and add the turkey.  Break it up and brown the turkey.  Add the paprika, cumin, thyme, salt & pepper. Once the turkey is brown, add the onions, carrots & celery.  Add a splash of liquid, cover and cook about 5 minutes. If the extra veggies you are using are raw (not frozen or canned), add them now too.  If they are frozen/canned, add them and the bell pepper after the 5 minute cooking time and cook for an additional 2 minutes.  Stir in the flour and cook for 2 more minutes.  Stir in the stock and simmer until the potatoes are ready.

Preheat the oven broiler with a rack that'll put your casserole dish about 5 inches from the broiler.

Once the potatoes are tender, add a couple spoonfuls of cooking water to your beaten egg to temper it, then drain the potatoes.  Return the pan to the hot, but off burner to help dry the potatoes a smidge.  Mash with butter, salt & pepper then add in the egg.  Add a bit of milk/soymilk if they are too stiff.

Pour the turkey mixture into an oven-safe casserole.  Spoon and spread the mashed potatoes over the casserole.  Cook under the broiler until the mashed potatoes start to turn golden around the edges. Mine took about 8 minutes.  Serve with a side salad and you have an amazingly yummy, very hearty and satisfying winter meal.  YUM!

Reading more...

I want to read more. I also want to play fewer Facebook games. That's been much easier since I've given up on Pioneer Trail when they started getting a little overzealous with the missions. I think I had over 30 at one point and I just gave up. Reading has also been much easier since my hubby gave me my snazzy new Kindle Fire for my birthday in November. I LOVE being able to check out books from the library on it. It enables my reading AND fits my cheap nature.  I've read more books in a month and a half then I had the whole year before.  I can fit a huge selection right into my purse and read during any little break or waiting period.  LOVE IT!

I have a friend who is a book review blogger... check her out at Chaos Is a Friend of Mine.  Sometime in the next week, Rachel will share all the challenges she is going to participate in for 2012.  Last year, I think she signed up for about 6 challenges, totalling... I don't know... a LOT of books.  To encourage myself to read more in 2012, I thought I'd sign up for a challenge or two as well, only I'm going to be a bit more conservative.

I am a big fan of the public library so for sure I plan to sign up for their 6 in 12 Adult Reading Challenge.  I'm pretty sure I can manage at least 6 books in 12 months.  AND each book read (no limit) counts as an entry to win one of 5 eReaders and other assorted prizes.

That seems TOO easy though and not much of a challenge.  I mean really... even when I wasn't reading much I could manage 6 books in 12 months.  So I thought I'd take a page out of Rachel's challenge book and pick one of the challenges on her list (from last year since she hasn't published her 2012 list of challenges yet).  Because it sounds like fun, I am picking the What's in a Name 5 Reading Challenge.  The categories for 2012 are:
  1. A book with a topographical feature (land formation) in the title: Black Hills, Purgatory Ridge, Emily of Deep Valley
  2. A book with something you'd see in the sky in the title: Moon Called, Seeing Stars, Cloud Atlas
  3. A book with a creepy crawly in the title: Little Bee, Spider Bones, The Witches of Worm
  4. A book with a type of house in the title: The Glass Castle, The Girl Who Kicked the Hornet's Nest, Ape House
  5. A book with something you'd carry in your pocket, purse, or backpack in the title: Sarah's Key, The Scarlet Letter, Devlin Diary
  6. A book with a something you'd find on a calendar in the title: Day of the Jackal, Elegy for April, Freaky Friday, Year of Magical Thinking

It will encourage me to try some new things while also giving me a fun scavenger hunt to find books that fit each category.  While both challenges allow overlap (letting the same book count on more than one challenge), my goal is 12 books for the year.  That should be imminently doable.  Then maybe next year I'll double it.

Sunday, December 25, 2011

Merry Christmas!

Merry Christmas! Happy Holidays! Merry Yule! Happy Hanukkah! Seasons Greeting! Whatever the greeting that speaks to you, may I send it to you. May the peace, magic and happiness of this special time of year be yours to share.

Tomorrow, I'll start sharing all the fun crafts I made for gifts. I have too many family members who read my blog so I couldn't share before. Just bookmark or pin and plan for next year. ;-) Today... I play with my own new toys (iPod Nano at the moment) and help my kids play with theirs.

Monday, December 19, 2011

Press Dough! Oh no!

I long for the days when the children's favorite shows were on Noggin and PBS Kids.  Noggin and PBS Kids don't air commercials.  Now that their favorite show is My Little Pony: Friendship is Magic... okay, EVERYONE'S favorite show is now My Little Pony: Friendship is Magic... we are a family of bronies... where was I?  Right!  MLP:FIM is on The Hub.  The Hub airs commercials... a lot of commercials... a lot of the stereotypically awful children's commercials that involve every marketing ploy known to entice your kids to want everything they see.

We make it pretty clear that requesting something they've only seen on a commercial just doesn't fly.  We show the kids reviews online of products that seem so cool on TV.  The reviews almost always point to the product being less... WAY less... than implied in the shiny commercial. Fushigi anyone?  Occasionally though one product just sticks with one of the kids and he or she won't drop the desire for that product.  The most recent obsession was Risa's and Press Dough.  She really REALLY wanted to make sugar cookies like they had on that commercial.  The requests for Press Dough have been consistent for several months and were brought up at times far removed from the viewing of any commercials.

Wanting to honor her desire, but not really wanting to pay $20 for over-glorified Playdoh tools that would be used once, I came up with the next best thing... or rather, the original best thing... Playdoh tools!  Press Dough is essentially tools for dough.  Playdoh makes fun, colorful tools for dough.  We already owned a LARGE box of fun, colorful Playdoh tools.  After a spin in the dishwasher, they worked GREAT!  Risa and I had a fun time making sugar cookies.  We used a sugar cookie dry mix.  Divided in half and alternated between using the dough and keeping it cold, the dough worked great with the Playdoh tools.  We didn't dye the dough though that would be easily done.  We had a pleasant afternoon, saved $20 and satisfied her cookie making wish.  WINNING!


Saturday, December 17, 2011

Oops! I did it again...

Well, almost anyway.  I nearly forgot to take a picture of dinner.  What I wound up with is a picture of the last little bit left in the skillet.  I almost got there.  Better than when I usually remember... when all of it is long since nommed.

Turkey & Stuffing Pot Pie

1 Tbl cooking oil
1/2 cup onion, diced
1/2 cup, bell pepper, diced
1 carrot, diced
2 celery stalks, diced
2 Russet potatoes, peeled and diced
2 cups cooked turkey
3/4 cup water
3/4 cup soymilk
3 Tbl flour
1 tsp Italian seasoning
1 tsp onion powder
Salt & pepper, to taste
1 Tbl nutritional yeast, optional
4 cups stuffing mix, such as Stove Top or Pepperidge Farms
1 cup chicken stock

Pre-heat oven to 425.  Heat oil in an oven-safe skillet. Add veggies and cook on medium to medium-high heat until veggies are about halfway tender/cooked.  Add turkey to skillet.  In a jar with a lid, add water, milk, flour, Italian seasoning, onion powder, salt, pepper and nutritional yeast.  Put lid on and shake to stir.  Add to skillet.  Pour chicken stock into a glass container (microwave-safe) and microwave for a minute or two to warm.  Add to stuffing and mix with a fork.  Layer stuffing over the top of the skillet.  Cook in the oven until hot and bubbly, 20-30 minutes.

NOTE ONE:  I used a little less liquid than this and it wasn't enough.  It was good but a smidge too dry for a pot pie-type casserole.  This amount may still not be enough.  It is a 1/2 cup total more than I used (I used 1 cup total).  It may very well need to go up to a full 2 cups of liquid.

NOTE TWO: This is a good place to stash those little dredges of freezer veggies or leftover veggies that add up.  I added some sugar snap peas to mine that fell into the former category... why does anyone leave 10 peas in a bag in the freezer?  Were those extra 10 just TOO MUCH to go ahead and throw in the pot the last time they were out to be cooked?

Wednesday, December 14, 2011

Golden Snitch Ornaments

My die-hard Harry Potter wouldn't even consider looking further once we found the Golden Snitch ornament idea on Tiny Apartment Crafts found here: http://tinyapartmentcrafts.blogspot.com/2010/12/golden-snitch-ornament-tutorial.html  The wings are a multi-day process with drying time so plan ahead.

Supplies needed:
Crafting wire - I used 20 gauge. I used silver because it's what I had in the gauge I wanted. You can get it in gold.
Sheer white, ivory or gold fabric - I used some white leftover from making window sheers
Fabric or other multi-purpose glue - I used Liquid Stitch
Gold glitter fabric paint
Small gold plastic ornaments - found ours at Target, 24 for $5
Hot glue
Metallic gold paint
Gold paint pen, optional

Cut a 6" piece of wire.  Make the first bend at 2 1/2".  That 2 1/2" length is the top of the wing.   Bend the bottom scalloped edge into the remaining wire, twist the end around and snip off any extra.  I used a combination of round-nose pliers and chain-nose pliers to shape my wings.

Cut small pieces of the fabric, slightly bigger than your wings.  My son used a paintbrush to get the glue onto the wire.  Once the glue is on, attach the fabric and set aside to dry.


Once dry, trim the excess fabric.  I debated trying to fold it over and gluing more but that didn't look good when I tried one.


Paint the wings with gold glitter fabric paint. I debated getting the Soft variety but it was twice as expensive as the standard dimensional paint. The dimensional fabric paint worked just fine. This took a couple days too as we painted each side twice to make sure they were very glittery.

I strayed from the original directions in two ways with the wings... one, I used fabric and not tissue and, two, I used fabric glitter glue instead of straight glitter.  One word for my reason... kids.  The tissue would've been too fragile and the glitter was a wee bit more potential mess then I wanted to risk.

Once the wings are dry, it's time to make the snitches!  I used hot glue and it worked beautifully.  I spread a bead of glue around the coiled end of the wing first, then applied a pea size dollop to the ornament.  Attach and hold... you have to wait for the glue to cool and mostly set.  Fortunately, with low-temp hot glue, that only takes 30 to 40 seconds.  However, if you are making a dozen like we did, that does add up to some time as you hold each little wing individually.  Once the glue was fully cooled and set, my son painted over the hot glue with metallic gold paint.

The optional paint pen is if you would like to take a plain gold ornament and mark it with snitch designs.  Jasper decided he liked the polka dots, stripes and other designs on some of the ornaments in the bundle we got so we didn't do this.

Monday, December 12, 2011

Stocking Stuffer List

I'm kind of an obsessive list maker.  Many are useful. Some turn out to be sort of time wasters but I had fun making them nonetheless.  I will, from time to time, share my crazy lists here.  This one is timely, I hope... stocking stuffer ideas.  I could probably add twice this many to a list, but this one is geared a smidge toward my own family.  Still, 120 ideas should keep you busy for a while.  You can click the cute bears or the text link below them to go to the Google doc.


Sunday, December 11, 2011

Handprint Snowman AND Glitter Ornaments

Holy cow!  How has it already been a week since my last blog post?!  With my insane schedule, I'm going to have to set some definite blog post writing time.  Of course, this week is complicated by the fact that I haven't been doing much of the cooking and that most of my blog post-worthy projects involve things I'm giving as Christmas gifts.  I hate to wait until AFTER Christmas to share, but some of the recipients do read my blog.

Tonight, though we were finishing up Risa's ornament.  For the last several years, the kids have picked out a few ornament designs to make to give as gifts.  Last year, I prepped about 8 or 10, I don't know... too many... designs for them to choose from.  What a craft-tastic mess!  This year, they each picked ONE ornament to make a dozen of (each).  The ornaments are a bit more complicated though.  Tonight, I present Risa's choice.

Handprint Snowman and Glitter Ornaments


Risa was not content to just buy a colored ornament and put snowman handprints on it.  No no.  The girl wanted glitter!  So we used the glitter ornament how-to from I'm a Yarner found here: http://yarner.blogspot.com/2011/10/glitter-ornament-tutorial.html

Supplies Needed:
Clear glass ornaments
Future Floor Finish (it's what I had under the sink versus the Pledge called for in the original list)
Funnel (or envelope to use as a funnel)
Glitter - original called for extra fine. We used "regular" fine until we ran out then used bigger glitter.  You need extra fine or fine.  The bigger glitter, while pretty, didn't have the same WOW factor.
2 spare containers for extra floor finish and extra glitter

Pop out the metal tops on the ornament.  Pour a shot of Future into the ornament and swirl to coat the inside. Don't shake.  You want to keep bubbles to a minimum.  Pour glitter into the ornament. Cover the top with a finger and THEN shake to coat.  This takes more glitter than you realize.  Pour the excess out into another bowl.  Reuse that extra to make more ornaments.  I wouldn't plan to use that for anything else since it'll likely have some of the floor finish on it.  I then waited a day for the "glue" to dry before recapping the ornaments.

We found the handprint snowman idea from Full of Great Ideas here: http://fullofgreatideas.blogspot.com/2010/11/five-fingers-snowman-ornament.html

Supplies Needed:
Glitter ornaments
White craft paint
Permanent markers

Pour white paint on a plate.  Have your child press their hand into the paint.  Carefully place the ornament in their hand and have them wrap their hands up around the ornament.  Have them open their hand again and carefully remove the ornament.  Put it upside down in a cup or egg carton to dry. Once dry, use permanent markers to make the snowman.  I used mostly larger tip markers.  The medium tip Sharpies did not like to work on the paint finish and dried out easily.


The pale pink are the ones made with the bigger glitter.  Just not the bling factor that's present in the fine glitter.  Though, with the snowman, the pale pink looks a bit like snowflakes.  I wrote her name and the year on the bottom of each ornament.  The missing one has already made its way to Ama and Apa's house in Alabama.  And yes... I still have one to do.  I just didn't have it in me tonight.  

Sunday, December 4, 2011

Teriyaki Tofu & Butternut Squash over Quinoa

I have GOT to start remembering to take pictures.  ARGH!  Sorry.  Still no pics tonight and all of the food is warming my family's bellies.

This is a FAST dinner.  I had it on the table well under 30 minutes.

Teriyaki Tofu & Butternut Squash over Quinoa

Cooking oil (I used canola)
8 oz. pkg. extra firm tofu (non-silken preferrably), cubed
1/4 cup teriyaki sauce
2 Tbs flour or cornstarch
1 medium butternut squash, peeled & cubed
1 Tbl dried thyme
3 Tbl walnuts, chopped
2 Tbl fresh ginger, peeled & chopped
Quinoa, cooked

Combine the tofu, teriyaki and flour/cornstarch in a dish.  Heat 2 Tbs oil over medium-high heat in a 10" skillet.  Once hot, add the tofu, stirring occasionally.  While the tofu is browning, put the butternut squash in a covered glass dish with 3 Tbs water and microwave for 3-5 minutes, depending on your microwave.  You just want to soften up the squash so it will cook faster.

Once the tofu is mostly browned, remove from skillet.  I removed most of the fond left in the pan.  You may choose to leave it.  Add 2 Tbs oil to skillet and butternut squash.  Cook until butternut squash is mostly browned.  Add thyme, walnuts & ginger.  Cook 1 minute.  Return the tofu to the pan and cook another 1-2 minutes.  Serve over cooked quinoa.

Quinoa


1 cup quinoa
2 cup water

Put quinoa and water in a saucepan together.  Cover.  Bring to a boil.  Reduce heat to simmer and cook 12-15 minutes.  It's that easy.

This was yum!  I think I might use a little more teriyaki sauce next time, maybe at the end so the whole thing was a little saucy.  As it is, there isn't really any sauce leftover.  Still... a winner!  And FAST!

Friday, December 2, 2011

Wilted Cabbage with Bacon

Certain family members (cough, Jason, cough) don't like cooked cabbage.  (He claims it's a texture thing).  So I'm always trying to come up with new ways to make, essentially, cole slaw with all the cabbage I get from either my own garden or my farmer friend. Tonight, I came up with a slightly cooked, but still crunchy dish that satisfied both the picky cabbage eater AND my desire for something WARM.

Wilted Cabbage with Bacon

4 slices Bacon, cut into small pieces
1/2 medium Onion, diced
3 large cloves Garlic, diced
1 medium Cabbage, sliced/chopped
1/2 cup Vinegar, herbed if you have it

Cook the bacon in a 10" or larger skillet over medium heat.  I used my trusty cast iron.  Remove bacon when it's done but not too crispy.  Leave the bacon dripping in the pan and add the onions.  Once the onions are starting to become translucent, add the garlic.  Cook 1 minute longer than add the cabbage, stirring everything together.  Cover and let cook for 5 to 8 minutes or until the cabbage is warm and starting to wilt. Add the bacon back to the skillet, cook for another 2 minutes to reheat the bacon.  Drizzle the vinegar over the cabbage and serve.

YUM!  Tonight as I was serving dinner, and I served Jason a large helping of cabbage, my mother-in-law suggested maybe I'd given him too much cabbage.  I responded "He's going to eat that cabbage and he's going to like it."  And he did.