Showing posts with label christmas. Show all posts
Showing posts with label christmas. Show all posts
Monday, December 29, 2014
Thursday, January 2, 2014
Holiday Tea Party for Kids (courtesy of Pinterest)
My 6 yo daughter is a gymnast and part of a whole team of adorable tiny gymnasts. The girls are all good friends and love working out in the gym together, competing together AND playing together. Risa is an apple who has not fallen far from the tree. Just like her mama, she LOVES to entertain and have friends over. Any excuse will do. A holiday tea party and book exchange with her gymnastics teammates was a perfect way to blend a love of entertaining and love for her teammates.
The Saturday before Christmas with a winter storm on its way, we had her teammates over for "tea". (Only the grownups drank tea. The girls preferred hot chocolate.) Risa's guests all wore their holiday finery.We started the party at our dining room table making Christmas ornaments. A quick trip to Michaels had netted a kit to make adorable Creatology Felt ornaments, including a reindeer, Santa and penguin. I also set out some metallic pipe cleaners and pony beads in holiday colors. My review of the felt stickers for the ornaments is "pass" in the future. I'll stick with foam stickers instead. While the ornaments were super cute, the paper backing was very difficult to get off the felt. Most of the girls just couldn't manage it so the other parents and I spent the whole time taking paper sticker backings off and cursing under our breath. I did find that using a pin to slice the backing a bit made it nominally easier to get off. That wasn't always easy though given the tiny size of the some of the stickers.

The girls then played freely about the house while making frequent trips by the snack buffet Risa and I had prepared. Though very cute and perfectly fancy for a tea party, none of the snacks were difficult or time intensive to prepare. I'll list each separately with a link to the blog where we found the idea to give credit where credit is due. The pictures are my versions.


We didn't use mini marshmallows. Not because I was opposed to them. But our toothpicks were too short.

Ours were more inspired by the linked version. We cheated with Pillsbury sugar cookie dough and used dark chocolate M&Ms for the eyes and nose. Have I mentioned the one thing I hate about our new house is the stove? Expect to see a lot of OGB (overly golden brown) baked goods until I get that darn thing replaced.

Broccoli & Cherry Tomato Christmas Tree
We found lots of inspiration for this tree so I can't give credit to any single blog. We picked vegetables my kids like. On the day of the tea party, the veggies were barely touched. The next day with close friends over to celebrate, I recreated the tree and it was GONE in an hour with a different set of kids.

Once the snacking started to die down and the running rampant through the house was getting boring, the girls asked to play the games we'd prepared. Again, these were very simple with little prep work. The first game was Penguins. Prep work... gathering a stack of white paper. Penguins is like musical chairs but instead of chairs, the "penguins" move between "ice flows" (the sheets of paper). Everyone starts on an ice flow then the music starts. I used the Christmas music channel on our cable service. I gave each penguin a candy cane as she was eliminated. The final two were so close to hitting the ice flow at the same time we decided to call it a tie and they each got two candy canes.
Next we played Animal Charades. I had printed up pictures of common and popular animals before the party. As each girl had a turn, she would draw a picture from the stack and then act out that animal. The animals weren't too difficult and all were fairly easily guessed but the antics while pretending to be the different animals garnered a lot of laughs.
The final arranged game was the book exchange. Rather than making everyone responsible for yet one more gift to purchase, we did a "previously loved" book exchange. Everyone brought a wrapped book selected from her own library. For the game, the girls sat in a circle, each with her own book in her lap. Starting with my daughter and moving clockwise, each girl rolled a die. I put the die in a small, clear plastic container to keep track of it more easily. Depending on the number rolled, the girls did something with the books. We used one die and the following number instructions:
1 - Freeze your gift (keep it for the rest of the game) OR switch with anyone.
2 - Switch your gift with anyone.
3 - Switch with the person on your right.
4 - Everyone pass to the person on your right.
5 - Switch with the person on your left.
6 - Everyone pass to the person on your left.
We went around the circle twice rolling the die. After two passes, three girls had wound up back with their own books so we continued on until everyone had a different book. Then everyone opened her book.
Alas I have few pictures from the actual festivities. I am just awful at remembering to take pictures while I'm hosting a party. For the kids' birthday parties, I have assigned friends who take the pictures for me. I forgot to designate a photographer this time. Fortunately, one of the parents here got this great shot of the girls during the gift exchange game.


I would encourage anyone to jump right in with entertaining. A "fancy" party doesn't have to take a lot of prep work. This party took me about 3 hours for all the invitations (evite.com), planning and prep... 3 hours that were spent with my daughter enjoying each other's company.
Saturday, December 28, 2013
Wednesday, December 25, 2013

Friday, December 21, 2012
2012 Christmas Ornaments
Every year the kids get to both make an ornament to gift to family and friends and buy an ornament. When they are on their own, I'll give them all the ones they picked out to buy plus one of each that they made to decorate their first trees.
In 2011, Jasper made a Golden Snitch Ornament and Risa made a Glitter / Handprint Snowman Ornament.
In 2012, we are still sparkly. Jasper selected a penguin / snowglobe ornament inspired by a Parent's.com craft.


In 2011, Jasper made a Golden Snitch Ornament and Risa made a Glitter / Handprint Snowman Ornament.
In 2012, we are still sparkly. Jasper selected a penguin / snowglobe ornament inspired by a Parent's.com craft.

You can follow directions for how to make the pipe cleaner penguin on their site... though those instructions aren't perfectly clear. I may do a step-by-step pictorial of how to make them. Jasper went with one penguin, a tree and a cupcake pick that says "Merry Christmas". I couldn't find clear sided cups but Jasper actually likes the looks of the rippled sides better. I used old Christmas cards to cut out the bottom piece so the ornament is fancy on the bottom too. And I hot glued the hanger to the top. I was afraid the cup would break if I tried to poke a hole through it.
Risa went with a lovely peacock / pine cone ornament inspired by a craft from The Kids Fun Review.

We used craft foam for the body and Risa added lots of peacock blue glitter paint to the pine cone.
Sunday, December 25, 2011
Merry Christmas!
Merry Christmas! Happy Holidays! Merry Yule! Happy Hanukkah! Seasons Greeting! Whatever the greeting that speaks to you, may I send it to you. May the peace, magic and happiness of this special time of year be yours to share.
Tomorrow, I'll start sharing all the fun crafts I made for gifts. I have too many family members who read my blog so I couldn't share before. Just bookmark or pin and plan for next year. ;-) Today... I play with my own new toys (iPod Nano at the moment) and help my kids play with theirs.
Tomorrow, I'll start sharing all the fun crafts I made for gifts. I have too many family members who read my blog so I couldn't share before. Just bookmark or pin and plan for next year. ;-) Today... I play with my own new toys (iPod Nano at the moment) and help my kids play with theirs.
Thursday, December 22, 2011

Wednesday, December 14, 2011
Golden Snitch Ornaments
My die-hard Harry Potter wouldn't even consider looking further once we found the Golden Snitch ornament idea on Tiny Apartment Crafts found here: http://tinyapartmentcrafts.blogspot.com/2010/12/golden-snitch-ornament-tutorial.html The wings are a multi-day process with drying time so plan ahead.
Supplies needed:
Crafting wire - I used 20 gauge. I used silver because it's what I had in the gauge I wanted. You can get it in gold.
Sheer white, ivory or gold fabric - I used some white leftover from making window sheers
Fabric or other multi-purpose glue - I used Liquid Stitch
Gold glitter fabric paint
Small gold plastic ornaments - found ours at Target, 24 for $5
Hot glue
Metallic gold paint
Gold paint pen, optional
Cut a 6" piece of wire. Make the first bend at 2 1/2". That 2 1/2" length is the top of the wing. Bend the bottom scalloped edge into the remaining wire, twist the end around and snip off any extra. I used a combination of round-nose pliers and chain-nose pliers to shape my wings.
Cut small pieces of the fabric, slightly bigger than your wings. My son used a paintbrush to get the glue onto the wire. Once the glue is on, attach the fabric and set aside to dry.


Once dry, trim the excess fabric. I debated trying to fold it over and gluing more but that didn't look good when I tried one.

Paint the wings with gold glitter fabric paint. I debated getting the Soft variety but it was twice as expensive as the standard dimensional paint. The dimensional fabric paint worked just fine. This took a couple days too as we painted each side twice to make sure they were very glittery.
I strayed from the original directions in two ways with the wings... one, I used fabric and not tissue and, two, I used fabric glitter glue instead of straight glitter. One word for my reason... kids. The tissue would've been too fragile and the glitter was a wee bit more potential mess then I wanted to risk.
Once the wings are dry, it's time to make the snitches! I used hot glue and it worked beautifully. I spread a bead of glue around the coiled end of the wing first, then applied a pea size dollop to the ornament. Attach and hold... you have to wait for the glue to cool and mostly set. Fortunately, with low-temp hot glue, that only takes 30 to 40 seconds. However, if you are making a dozen like we did, that does add up to some time as you hold each little wing individually. Once the glue was fully cooled and set, my son painted over the hot glue with metallic gold paint.
The optional paint pen is if you would like to take a plain gold ornament and mark it with snitch designs. Jasper decided he liked the polka dots, stripes and other designs on some of the ornaments in the bundle we got so we didn't do this.

Monday, December 12, 2011
Stocking Stuffer List
I'm kind of an obsessive list maker. Many are useful. Some turn out to be sort of time wasters but I had fun making them nonetheless. I will, from time to time, share my crazy lists here. This one is timely, I hope... stocking stuffer ideas. I could probably add twice this many to a list, but this one is geared a smidge toward my own family. Still, 120 ideas should keep you busy for a while. You can click the cute bears or the text link below them to go to the Google doc.

Sunday, December 11, 2011
Handprint Snowman AND Glitter Ornaments
Holy cow! How has it already been a week since my last blog post?! With my insane schedule, I'm going to have to set some definite blog post writing time. Of course, this week is complicated by the fact that I haven't been doing much of the cooking and that most of my blog post-worthy projects involve things I'm giving as Christmas gifts. I hate to wait until AFTER Christmas to share, but some of the recipients do read my blog.
Tonight, though we were finishing up Risa's ornament. For the last several years, the kids have picked out a few ornament designs to make to give as gifts. Last year, I prepped about 8 or 10, I don't know... too many... designs for them to choose from. What a craft-tastic mess! This year, they each picked ONE ornament to make a dozen of (each). The ornaments are a bit more complicated though. Tonight, I present Risa's choice.
Handprint Snowman and Glitter Ornaments
Risa was not content to just buy a colored ornament and put snowman handprints on it. No no. The girl wanted glitter! So we used the glitter ornament how-to from I'm a Yarner found here: http://yarner.blogspot.com/2011/10/glitter-ornament-tutorial.html
Supplies Needed:
Clear glass ornaments
Future Floor Finish (it's what I had under the sink versus the Pledge called for in the original list)
Funnel (or envelope to use as a funnel)
Glitter - original called for extra fine. We used "regular" fine until we ran out then used bigger glitter. You need extra fine or fine. The bigger glitter, while pretty, didn't have the same WOW factor.
2 spare containers for extra floor finish and extra glitter
Pop out the metal tops on the ornament. Pour a shot of Future into the ornament and swirl to coat the inside. Don't shake. You want to keep bubbles to a minimum. Pour glitter into the ornament. Cover the top with a finger and THEN shake to coat. This takes more glitter than you realize. Pour the excess out into another bowl. Reuse that extra to make more ornaments. I wouldn't plan to use that for anything else since it'll likely have some of the floor finish on it. I then waited a day for the "glue" to dry before recapping the ornaments.
We found the handprint snowman idea from Full of Great Ideas here: http://fullofgreatideas.blogspot.com/2010/11/five-fingers-snowman-ornament.html
Supplies Needed:
Glitter ornaments
White craft paint
Permanent markers
Pour white paint on a plate. Have your child press their hand into the paint. Carefully place the ornament in their hand and have them wrap their hands up around the ornament. Have them open their hand again and carefully remove the ornament. Put it upside down in a cup or egg carton to dry. Once dry, use permanent markers to make the snowman. I used mostly larger tip markers. The medium tip Sharpies did not like to work on the paint finish and dried out easily.
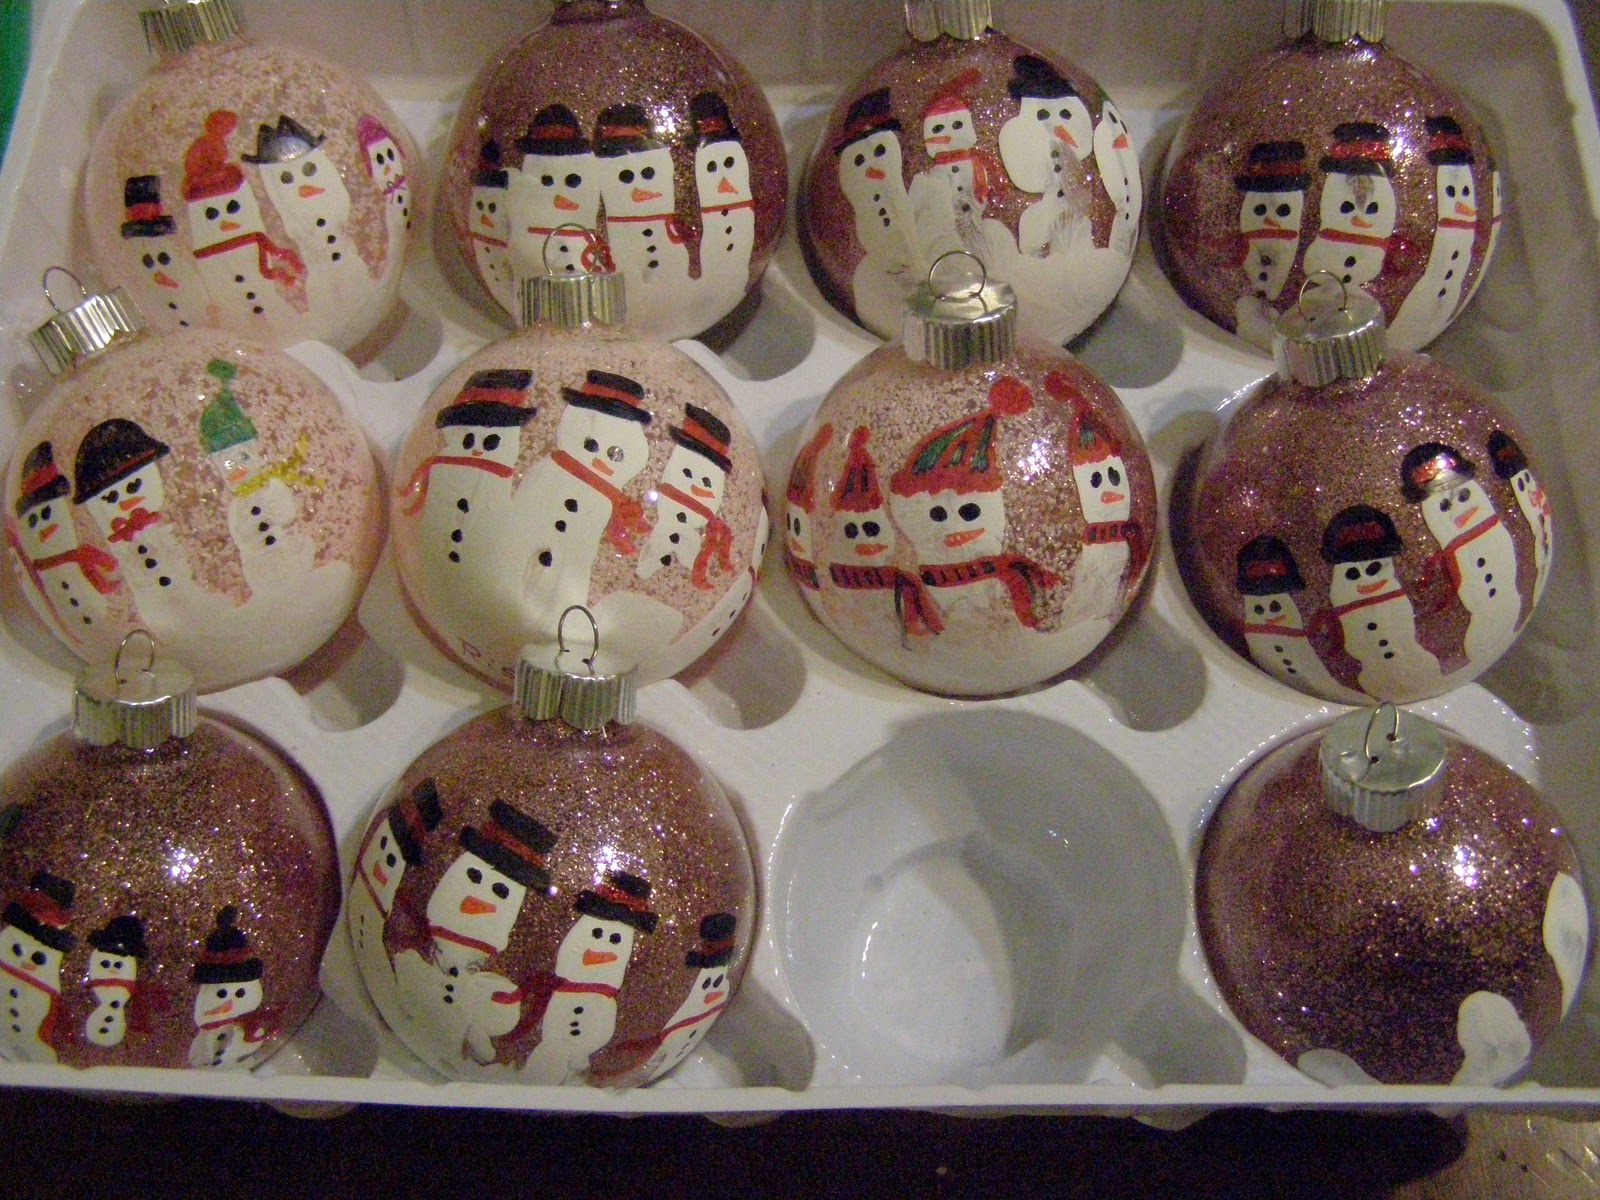
The pale pink are the ones made with the bigger glitter. Just not the bling factor that's present in the fine glitter. Though, with the snowman, the pale pink looks a bit like snowflakes. I wrote her name and the year on the bottom of each ornament. The missing one has already made its way to Ama and Apa's house in Alabama. And yes... I still have one to do. I just didn't have it in me tonight.
Subscribe to:
Posts (Atom)